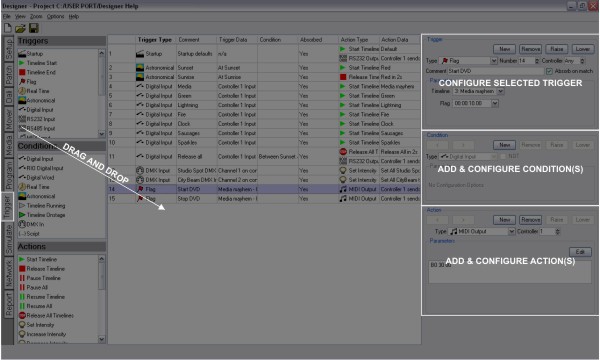
The Trigger window is used to “connect” your timeline programming to the outside world:
Controllers support a range of interfaces which can be used to trigger the playback engine including an internal realtime & astronomical clock. For example, digital input #1 (connected to a wall panel) could be set to start “Funky” timeline, “Advert” can be set to run on the hour every hour between sunrise and sunset and, at sunset, “Cleaning” would start.
The window comprises three sections: On the left are the Trigger, Condition and Action directories. In the middle is the trigger management area and the panes to configure the Triggers, Conditions and Actions are on the right.
To create a trigger, select and drag it from the directory and drop it onto the management area or press the ![]() button on the Trigger configuration pane and use the pull-down menu to select the required type, see basic, advanced and Remote Device triggers.
button on the Trigger configuration pane and use the pull-down menu to select the required type, see basic, advanced and Remote Device triggers.
For testing purposes it is sometimes useful to inhibit one or more triggers to examine more clearly the operation of others. A trigger can be inhibited by setting the controller number to None so that no controller processes the trigger, the row details will be displayed in grey.
If triggers/conditions/actions are not completely defined then they are highlighted in red to indicate that they need further attention.
The order in which triggers are displayed in the Trigger screen is the order in which they are tested by the system. Once a trigger is successfully matched then,if "Absorb on match"is checked, no further triggers are tested for that event; the event is absorbed.Thus this trigger order is important, particularly when using conditions.
If you had two identical triggers in your show then, assuming they had no conditions, only the first one encountered would ever be matched. However, if you add a condition to the first trigger then it will only match when the condition is true, and when it is false the second trigger will match instead.
The ability to have the same trigger have different results based on a condition is very powerful. For instance you might have a single digital input that starts one timeline during the day and another during the night.
You can either select and drag the trigger up or down within the management area to redefine the order or use the ![]() and
and ![]() buttons on the Trigger configuration pane.
buttons on the Trigger configuration pane.
In some cases it is useful for a matched trigger not to absorb the event and thus allow triggers further down the list, so there exists the option to disable the default behaviour (for triggers other than Realtime & Astronomical clock which default to unchecked) by unchecking the "Absorb on match" box for each trigger as required.
If you wish to constrain the trigger with a condition then drag one from the directory and drop it into the Condition field of the trigger or press the ![]() button on the Condition configuration pane and use the pull-down menu to select the required type, see conditions.
button on the Condition configuration pane and use the pull-down menu to select the required type, see conditions.
Up to 32 conditions can be applied to each trigger in this way and you can use the < and > buttons to select each one for configuration.
Use the ![]() and
and ![]() buttons to select the condition to be removed and press the
buttons to select the condition to be removed and press the ![]() button on the Condition configuration pane.
button on the Condition configuration pane.
To change the order in which conditions are tested, use the ![]() and
and ![]() buttons on the Condition configuration pane.
buttons on the Condition configuration pane.
Every trigger needs an action, the thing to do, which you can drag from the directory onto the Action field of the trigger or press the ![]() button on the Action configuration pane and use the pull-down menu to select the required type, see basic, advanced and Remote Device actions.
button on the Action configuration pane and use the pull-down menu to select the required type, see basic, advanced and Remote Device actions.
Up to 32 actions can be applied to each trigger in this way and you can use the ![]() and
and ![]() buttons to select each one for configuration.
buttons to select each one for configuration.
Use the ![]() and
and ![]() buttons to select the action to be removed and press the
buttons to select the action to be removed and press the ![]() button on the Action configuration pane.
button on the Action configuration pane.
To change the order in which actions are executed, use the ![]() and
and ![]() buttons on the Action configuration pane.
buttons on the Action configuration pane.
Select the trigger to be copied in the management area and use right-click > Copy to create a copy in the row immediately below, very useful for defining similar triggers since all the defined conditions and actions are also copied.
Select the trigger in the management area and use right-click > Delete or press the ![]() button on the Trigger configuration pane, the entire trigger, its conditions and actions will be deleted.
button on the Trigger configuration pane, the entire trigger, its conditions and actions will be deleted.